A Google Stack is a set of Google-hosted properties about one business that all say the same thing: the same name, address, phone, website and Google Business Profile link, interlinked and pointing at the client’s pages. CloudStackly builds the automated part in about three minutes and checks every page is public. Two pieces, Google My Maps and Google Sites, have no automation interface, so the files are prepared for you and finished by hand in about ten minutes. This guide follows a real Entity Stack for a trucking company in Vancouver, WA from the first click to the published site.
THE WORKFLOW
What does a Google Stack build involve?
Choose the client, choose Entity or Keyword, and start the build. CloudStackly creates the properties in a managed Google account, links them to each other and to the client’s website and Google Business Profile, then fetches every public page without signing in and confirms it shows the business name or phone. You finish the three maps and the Google Site, mark them done, and the stack appears in the client report.
Stage
What happens
Where to go
1 · Prepare
Make sure the client profile has the name, phone, website, address and Google Business Profile link.
Clients
2 · Build
Pick the client, choose Entity Stack (10 credits) or Keyword Stack (5 credits), and build.
Google Stacks
3 · Verify
Watch the progress bar; every property must come back “Public ✓” before it is charged.
Google Stacks
4 · Finish in Google
Import the three map files into My Maps and paste the Sites page into a new Google Site; paste the links back.
My Maps · Google Sites
5 · Deliver
Add the client’s photos, then Copy all links; the stack is also listed under “Google properties” in the client report.
Google Stacks · Reports
STEP 01
What is a Google Stack and what do I get?
An Entity Stack is the full set of fourteen properties for one business location. A Keyword Stack is six properties around a single keyword and landing page. Everything is created inside a managed Google account that CloudStackly operates, so neither you nor the client needs a Google account to build one.
Ten properties are created and published automatically: a Drive folder that acts as the hub, a business overview Doc, an FAQ and service-area Doc, a resources Sheet, a Slides presentation, a request-a-quote Form, a public service-availability Calendar, a business-profile notebook, a business-card image and a resource page with LocalBusiness structured data. Four more are prepared as import files: three My Maps files (service-area circle map, location map, directions map) and a ready-to-paste Google Sites page.
Every published property carries the same name, address and phone, links to the website and the Google Business Profile, and links to the other properties in the stack. When the client has published Cloud Link pages, those are listed in the Sheet, the resource page and the Sites page too.
Entity Stack: 10 publishing credits, once per client location.
Keyword Stack: 5 publishing credits, one per campaign keyword.
Credits are charged only for properties that go live and pass the public check. Anything that fails is refunded.
Every live address is listed under the stack, on the Google Stacks page and on the campaign card, with a one-click Copy all links.
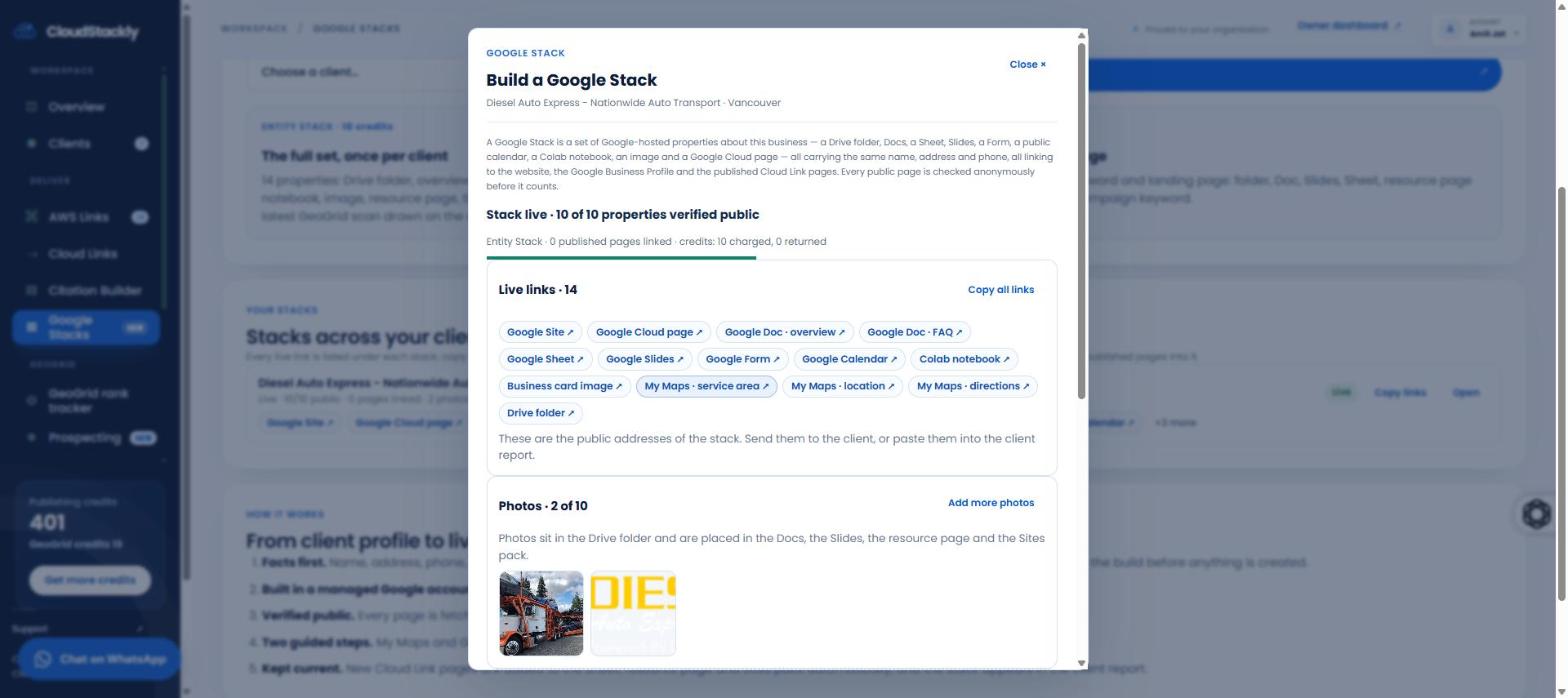
The screenshot shows a finished Entity Stack: ten of ten automated properties verified public, fourteen live links including the Google Site and the three maps, and two photos added.
Entity Stack · live screen · 14 live links, 2 photos
STEP 02
Where do I start?
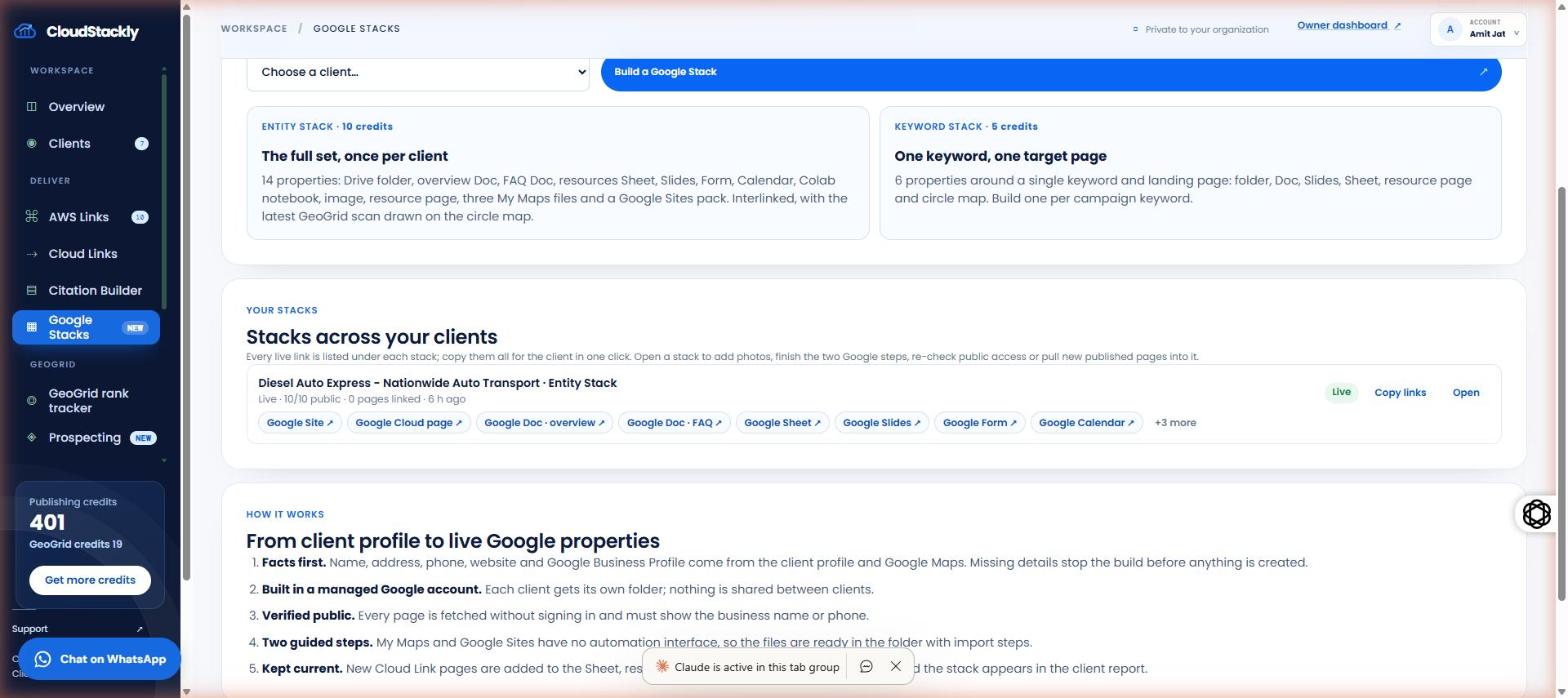
Open Google Stacks in the workspace sidebar under Deliver. Choose the client in the dropdown and click Build a Google Stack. You can also open any client in Clients and use the Google Stacks tab or the Google Stack quick action in the drawer.
Before you build, check the client profile. The build needs the business name, a phone number or website, the address or city, and ideally the Google Business Profile link. If something essential is missing, the dialog tells you exactly what to add and nothing is created or charged.
The page also lists every stack across your clients with its status, how many properties are public and how many published pages are linked, so you can reopen a stack at any time.
Run a GeoGrid scan for the client first if you can: the circle map then shows the business’s real map rank at each point.
A client can have one Entity Stack and any number of Keyword Stacks.
The Google Stacks page shows your available publishing credits in the top right of the New Stack panel.
Google Stacks page · live screen
STEP 03
Entity Stack or Keyword Stack?
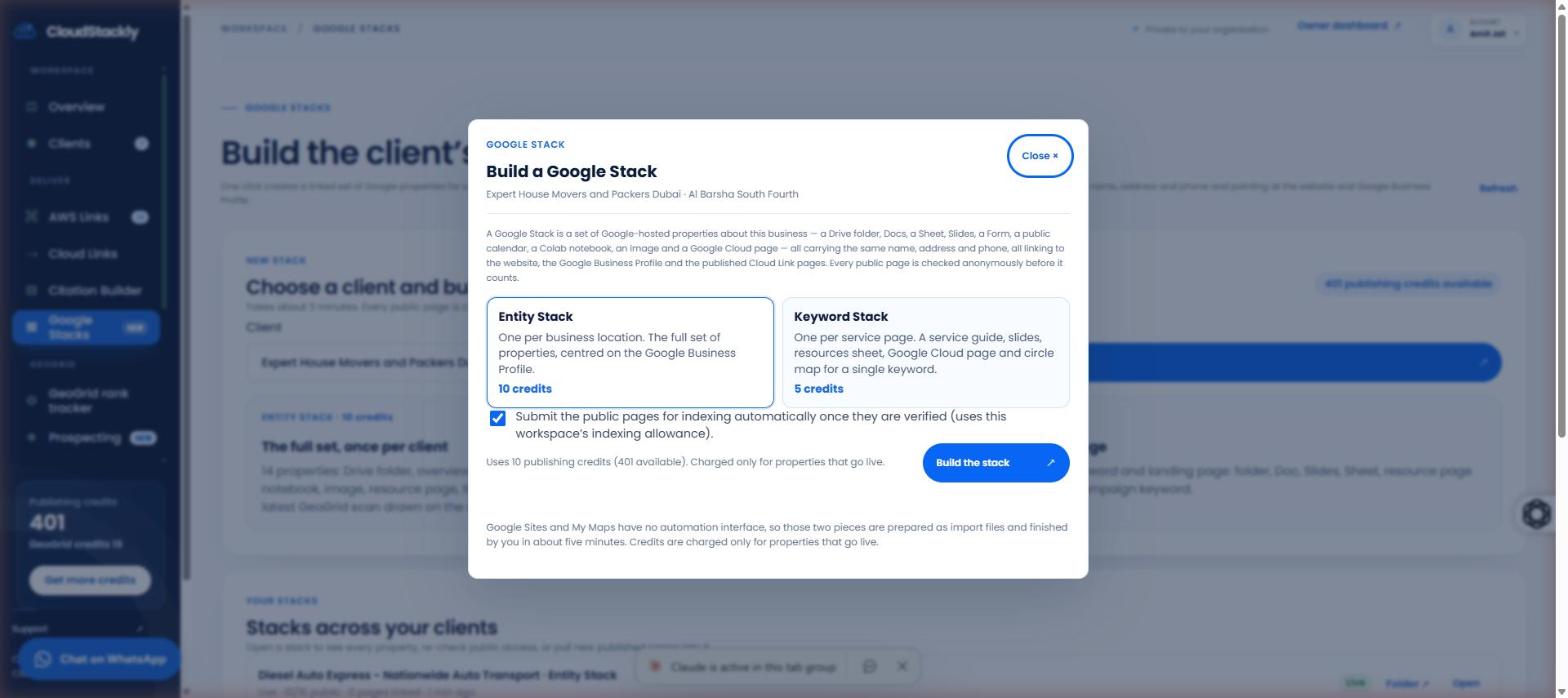
Choose Entity Stack for the business as a whole: it is centred on the Google Business Profile and built once per location. Choose Keyword Stack for one service page: pick the campaign or type the keyword and target page, and the six properties are written around that topic.
Leave “Submit the public pages for indexing automatically” ticked if you want the verified pages sent for indexing as soon as the check passes. It uses the workspace’s indexing allowance.
Click Build the stack. The dialog stays open with a live progress bar; you can close it and come back, the build continues on the server.
Keyword Stacks can take the keyword and target page from an existing AWS Link campaign so the Google properties and the article agree.
If the client already has a live Entity Stack, the dialog offers to refresh it instead of building a second one.
The screenshot shows the build form for another client with Entity Stack selected and ten credits about to be used.
Build form · live screen
STEP 04
What happens during the build and how is it checked?
CloudStackly collects the facts, writes the copy once for the whole stack, creates each property in order, interlinks them, then fetches every public URL without signing in. A property counts only when the page returns successfully and shows the business name or phone.
Properties are built in a fixed order: the Drive folder first, then the Docs, the Sheet, the Slides, the Form, the Calendar, the notebook, the image and the resource page. The four import files are written into the folder at the end. The whole run usually takes two to three minutes.
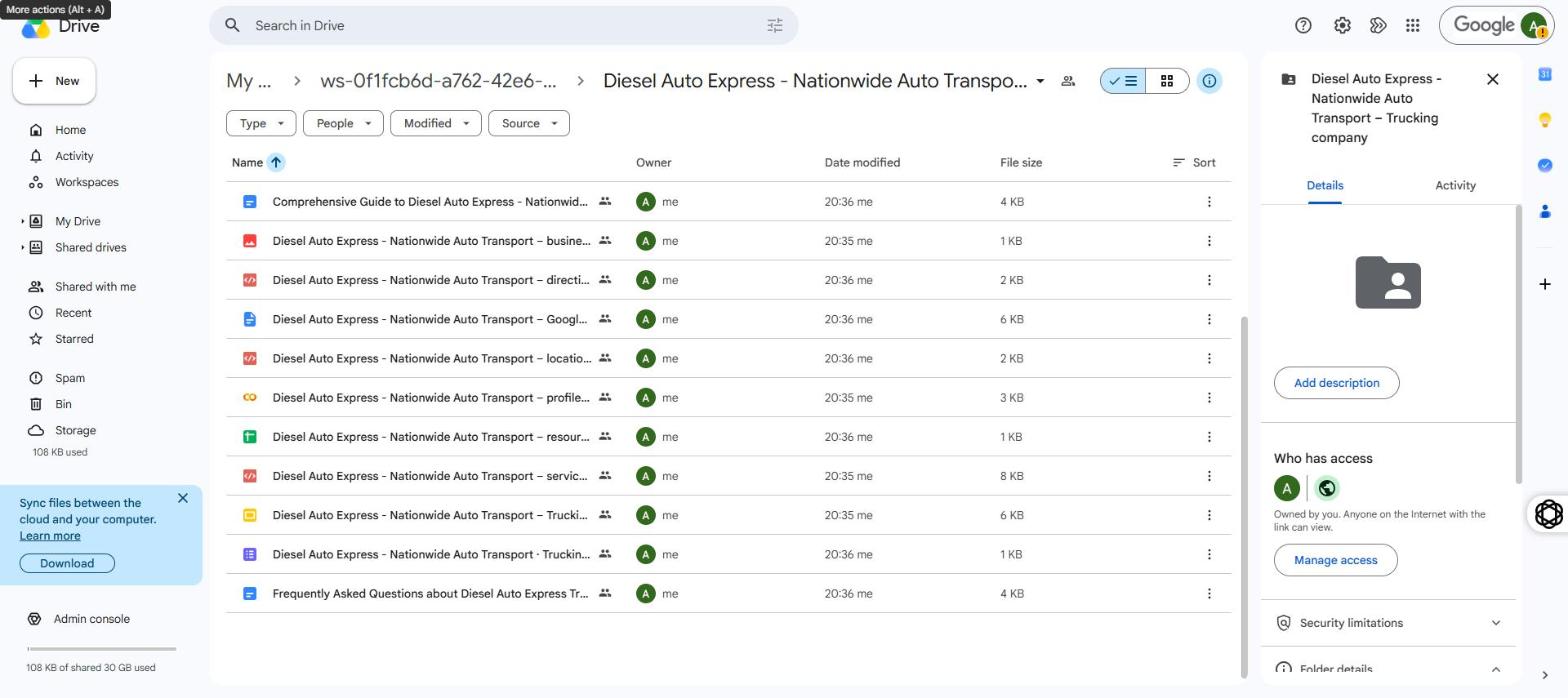
Open the Drive folder from the dialog to see every file. The folder is shared as “anyone with the link can view”, so the client and anyone else can open it without an account.
Public ✓ means the anonymous fetch returned 200 and found the business name or phone.
If Google refuses a property, the row shows the reason and the credit for that property is returned. Use Re-check public access after fixing anything on the Google side.
The screenshot shows the finished Drive folder: Docs, Sheet, Slides, Form, notebook, image, three map files and the Sites page, all owned by the managed account and visible to anyone with the link.
Drive folder hub · live screen
STEP 05
How do I import the service-area circle map into My Maps?
My Maps has no automation interface, so this is the first of two hand steps. Open mymaps.google.com in the Google account that should own the maps, create a new map, click Import under the first layer and choose the circle-map file from the Drive folder.
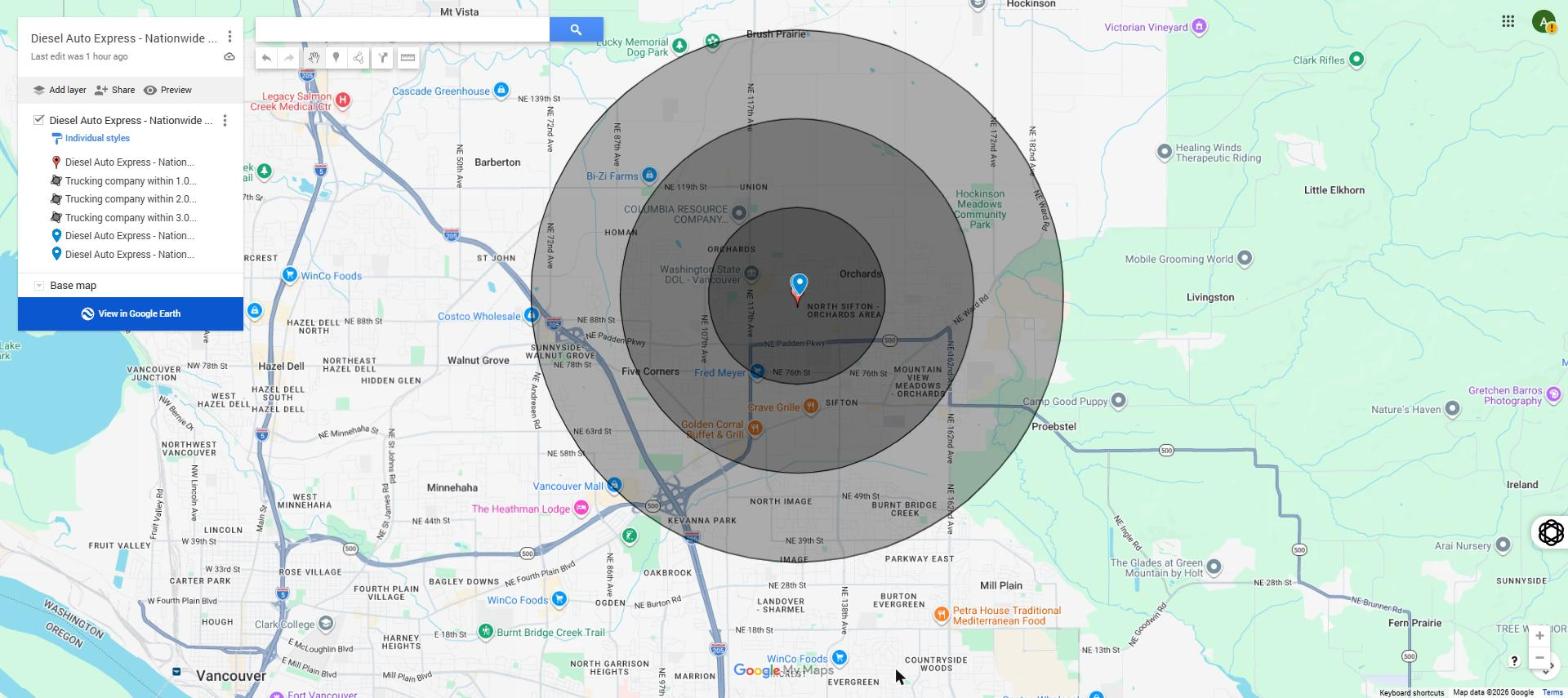
The import draws three rings around the business at one, two and three miles, a pin for the business and one pin per keyword variation. If the client has a GeoGrid scan, each pin is named with the keyword and the map rank at that point.
Click the map title to rename it after the business, for example “Diesel Auto Express – service area”, add a one-line description with the phone number, then click Share and turn on “Anyone with this link can view”.
Repeat with a new map for the location file, so the business has its own single-pin map.
Three separate maps, not three layers of one map, is the intended result.
The screenshot shows the imported circle map: three rings, the business pin and the keyword pins listed in the layer on the left.
Circle map in My Maps · live screen
STEP 06
How do I make the directions map show a real route?
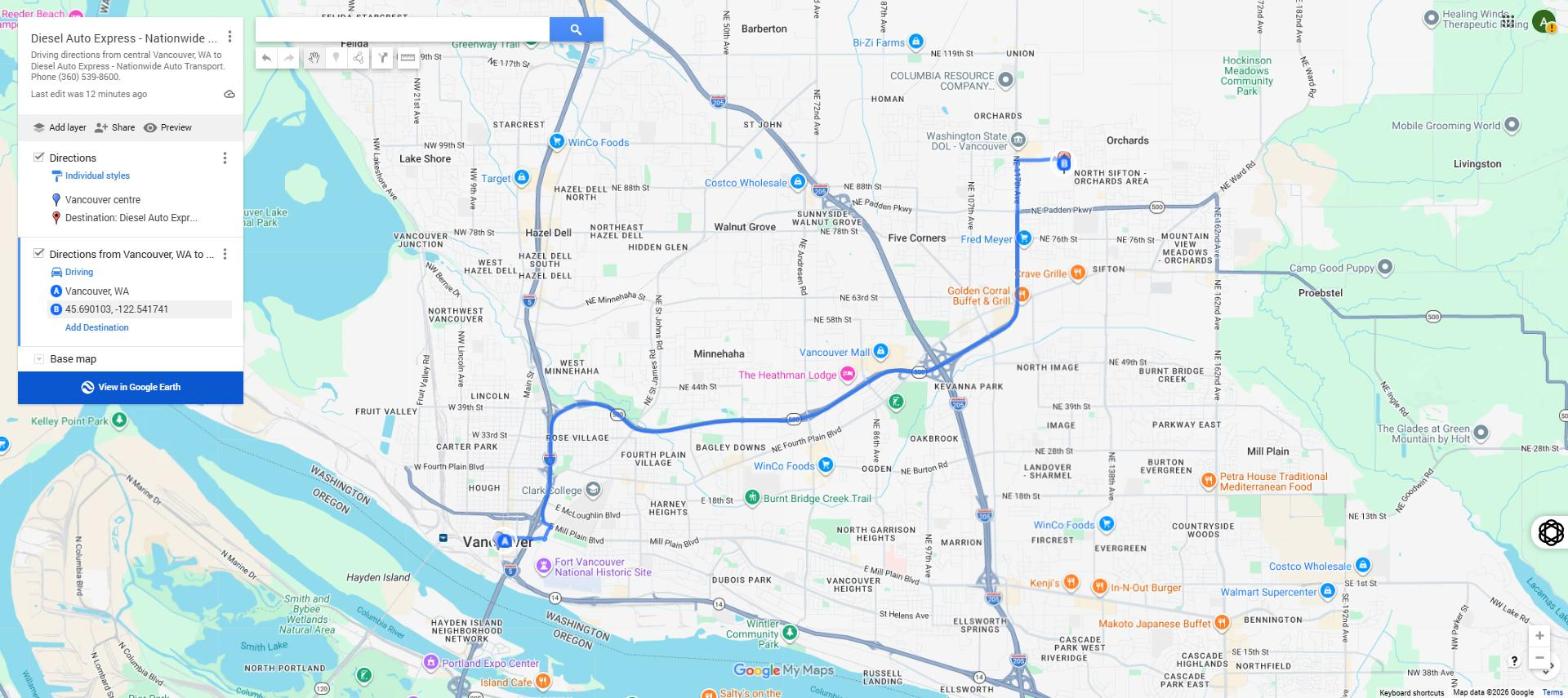
The directions file gives you two pins, the city centre and the business, plus a placeholder line. A real road route can only be drawn by My Maps itself, so after importing the file click the Add directions tool, type the city as A and the business address or coordinates as B, and Google snaps the route to the roads.
Once the real route is on the map, open the placeholder line and delete it so only the driving route remains. Name the map after the business, add the phone in the description and share it as “Anyone with this link can view”, exactly like the other two.
The business coordinates are in the directions file if you prefer to paste them instead of the address.
All three maps together take about three minutes.
The screenshot shows the finished directions map with the real driving route from central Vancouver to the business.
Directions map with a real route · live screen
STEP 07
How do I create the Google Site?
Open sites.google.com, start a blank site and name it after the business. Add a text box and paste the text from the “Google Sites page” file in the Drive folder, add two buttons for the website and the Google Business Profile, then use Insert → Embed → Embed code to add the resources list with links to every stack property. Publish with “Anyone” as the audience.
In the Publish dialog, check “Who can view my site”. If it says your organisation, click Manage and change the published site to Public, otherwise the page returns a sign-in prompt to visitors and search engines.
Leave “Request public search engines not to display my site” unticked. Copy the published address: it is the one you paste back into CloudStackly.
The Sites page file already contains the business summary, the address and hours, the FAQ and the full resources list, so this is mostly copy and paste.
Add the business-card image from the Drive folder with Insert → Images if you want a visual.
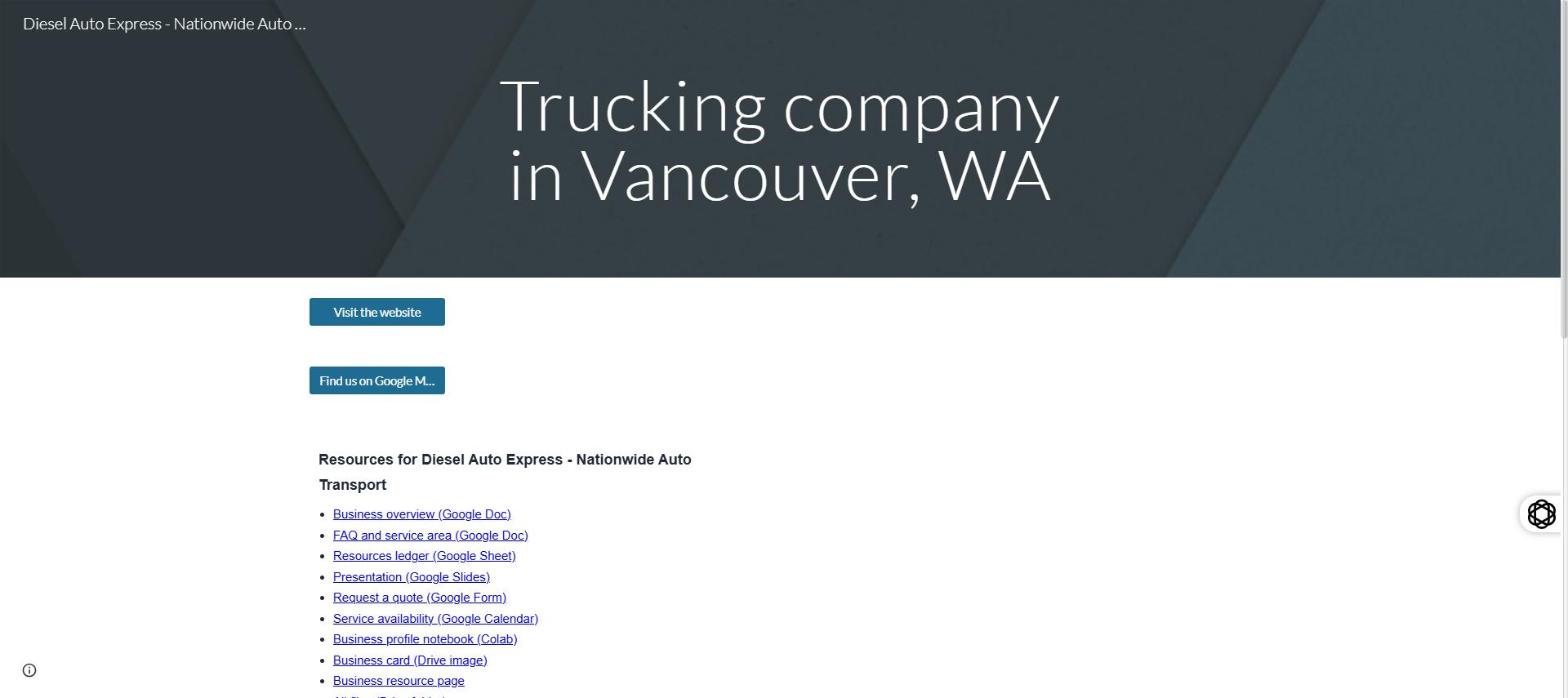
The screenshot shows the published site: the page title, the two buttons and the resources list linking to every property in the stack.
Published Google Site · live page
STEP 08
How do I attach the live links, add photos and keep the stack current?
Back in the stack dialog, scroll to “Finish in Google”. Each step has an Open button for My Maps or Google Sites and download links for its files. Paste the three My Maps share links into the box and click Mark as done; paste the published Sites address and click Mark as done. Those addresses then appear with the stack as live links.
The “Live links” block at the top of the dialog lists every public address of the stack: the Google Site, the resource page, the Docs, the Sheet, the Slides, the Form, the Calendar, the notebook, the image, the three maps and the folder. Click Copy all links to copy them as a labelled list for an email or the client report. The same links show on the Google Stacks page under each stack and on the campaign card, so you never have to open the stack to find an address.
Under “Photos”, click Add photos and choose the client’s logo, team, shop front or work photos (up to ten, free). Each photo is resized in your browser, stored in the stack’s Drive folder as a public file and placed in the overview Doc, the FAQ Doc, the Slides, the resource page and the Sites pack. You can add photos while the stack is still building or at any time afterwards.
Use Re-check public access any time to fetch every property again. Use Pull in new Cloud Link pages after publishing more pages for the client: the new pages are added to the Sheet, the resource page and the Sites pack, and the Docs get an updated links block. The stack is also refreshed automatically once a day, and it appears in the client report under “Google properties”.
Only sites.google.com and google.com/maps/d links are accepted as live links; anything else is skipped and you are told.
Cancelling a build keeps the properties already published and returns the reserved credits for the rest.
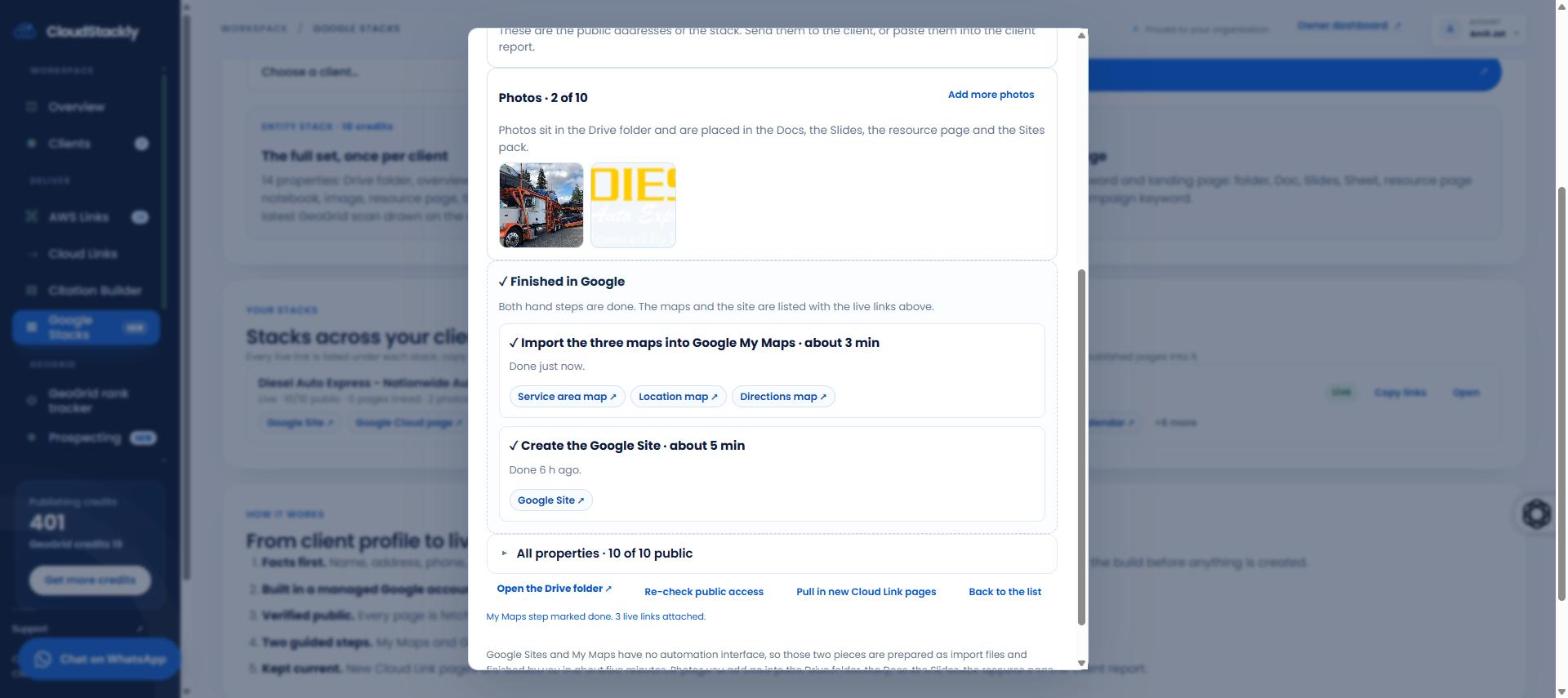
The screenshot shows the Photos block with the two photos added and the Finish in Google section with both steps done: the three My Maps links and the Google Site link attached as live links.
Photos and Finish in Google · live screen
STEP 09
Do my clients need a Google account, and who owns the properties?
No. The automated properties live in a managed Google account that CloudStackly operates for your workspace, each client in its own folder. Clients receive public links and a shared folder, never a login. Only the two hand steps, My Maps and the Google Site, need a Google account, and that can be any Google account.
If you or the client would rather own the maps and the site, download the three map files and the Sites page from the Drive folder and import them into your own Google account. The public pages, the folder and the resource page keep working regardless, and you still mark the steps done in CloudStackly.
Ownership of the automated properties stays with the managed account so CloudStackly can keep refreshing them with new pages and re-check that they are public. A client who leaves keeps every public link; nothing is deleted on their behalf.
Share the client report link or the Drive folder link with the client; both work without an account.
Never share your CloudStackly login or any Google login with a client.
The Drive folder sharing panel in the screenshot shows the setting that makes this possible: anyone on the internet with the link can view.